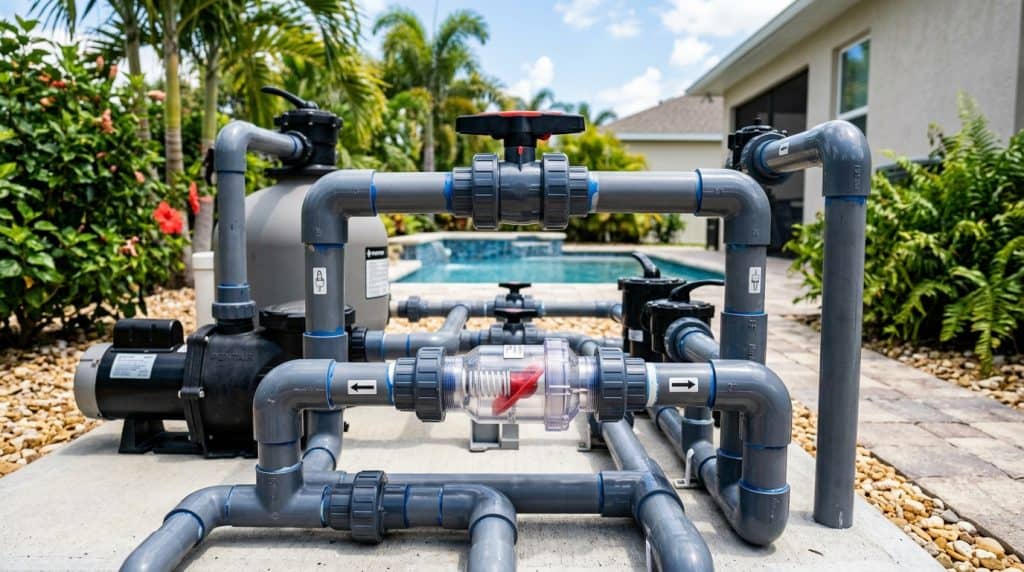
Here in the Tampa Bay area, our swimming pools aren’t just backyard accessories—they are central to our Florida lifestyle. Whether you are winding down after a long day with a soak in your spillover spa in Brandon, or hosting a weekend pool party in St. Petersburg, your pool equipment works hard under intense sub-tropical conditions.
Among the complex maze of PVC pipes, pumps, filters, and heaters sitting on your equipment pad, there is a small, often overlooked component that carries a massive responsibility: the check valve.
When a check valve fails, it doesn’t just cause minor inconveniences; it can lead to frustrating mysteries like your spa draining dry overnight, or catastrophically expensive disasters like your heater’s heat exchanger dissolving from concentrated acid. If you’ve noticed your spa acting strange or suspect a pool spa check valve leaking back, this comprehensive CPO-certified guide is for you.
—
What is a Pool Check Valve and How Does It Work?
In standard residential pool plumbing, water is designed to flow in a closed loop. However, there are times when water must flow in only one direction and be physically prevented from reversing. That is the sole job of a check valve.
Unlike diverter valves (such as 3-way or 2-way valves that direct water to different locations manually or via automation), a check valve operates automatically based on water pressure. It contains a spring-loaded flapper. When the pool pump turns on, the force of the moving water pushes the flapper open, allowing water to pass. The moment the pump shuts down and the flow of water stops, the spring snaps the flapper shut, sealing the pipe and preventing any water from slipping backward.
In typical pool-spa combination builds across Florida, you will usually find at least two crucial check valves:
- The Spa Return Check Valve: Located on the return line leading to the spa. It keeps the elevated spa water from rushing back down into the pool when the pump shuts off.
- The Heater/Sanitizer Check Valve: Located between your pool heater and your chemical dispensing equipment (like a salt chlorine generator or an offline tablet feeder). It prevents highly concentrated pool chemicals from back-flowing into your expensive heating system.
—
The Mystery of the Vanishing Spa: Spa Draining Into Pool Overnight Fix
It is a classic scenario we hear about constantly at Tampa Bay Pool Care. You heat up your spa in the evening, enjoy a relaxing soak, turn off the system, and go to bed. The next morning, you look out the window only to find your elevated spa is half-empty, and your pool’s water level is slightly higher than usual.
What is happening here? This is a textbook symptom of a failed check valve, and finding a spa draining into pool overnight fix is actually simpler than you might think once you understand the physics at play.
The Physics of Elevation and Gravity
Most pool-spa combinations feature an “elevated” spa that sits anywhere from a few inches to several feet higher than the main pool. When your pool pump is running, it actively pushes water up into the spa, which then overflows beautifully back into the pool via a spillway.
However, when the pool pump turns off, gravity wants to equalize the water levels. The water in the elevated spa naturally wants to flow backward through the return lines, down into the pool filtration system, and back out through the pool return jets.
Under normal circumstances, the spa return check valve stops this back-siphoning action instantly. But if you have a pool spa check valve leaking back, gravity wins. Water slowly seeps past the damaged flapper, draining your spa hour by hour until the water level equalizes with the pool.
Diagnostic Checklist: Is it the Check Valve or a Diverter Valve?
Before you start tearing apart your plumbing, perform this quick CPO diagnostic checklist to isolate the issue:
- Step 1: Check the elevation. Confirm that your spa is indeed elevated above the pool. If it is flush-level, gravity-fed draining is less likely, and the issue may be a suction-side leak.
- Step 2: Inspect the automated valve actuators. If your pool has automation (Jandy, Pentair, or Hayward controllers), ensure the return 3-way valve is rotating fully to the “pool” position when the system shuts down. If the valve stops halfway, water can drain back through the open gap.
- Step 3: Examine the check valve body. Look at the clear lid of your check valve (if you have a modern Jandy or clear-top valve). With the pump off, do you see water slowly trickling backward through the flapper? Do you see air bubbles or debris trapped inside?
- Step 4: Perform the “isolation test.” If you have manual valves that can completely shut off the flow to the spa return line, close them tightly before turning the pump off for the night. If the spa remains full overnight with the manual valves closed, your check valve is absolutely the culprit.
—
Anatomy of a Failure: Jandy Spring Check Valve Flapper Broken
When it comes to high-quality pool plumbing, Jandy (Zodiac/Fluidra) spring check valves are the industry standard. They are designed with clear high-temperature CPVC lids, allowing pool owners and service technicians to easily inspect the internal mechanisms without cutting any pipes.
However, no pool part lasts forever—especially in Florida’s intense heat, high UV index, and chemically active pool water. Over time, you may experience a jandy spring check valve flapper broken scenario.
Why Do Check Valve Flappers Fail?
The interior of a check valve is a harsh environment. Several factors contribute to the degradation of the flapper assembly:
- Chemical Degradation: If your pool chemistry is frequently out of balance—specifically with high chlorine levels or low pH—the rubber gasket wrapping the plastic flapper will begin to degrade. It becomes gummy, dry-rotted, or warped, preventing a tight seal.
- Spring Fatigue: The stainless steel spring inside the valve must constantly resist water pressure. Over several years, the spring can lose its tension, or snap entirely due to galvanic corrosion.
- Debris Blockage: Small pebbles, twigs, or fragments of pool plaster can travel through the lines and get wedged inside the check valve, physically holding the flapper open.
- Water Hammer: When variable speed pumps rapidly ramp up or automatic valves actuate quickly, a shockwave of water pressure (water hammer) can slam the flapper shut so violently that the plastic pin or hinge breaks off.
The Rebuild Solution
The beauty of Jandy-style check valves is that they are fully rebuildable. You do not need to hire a plumber to cut out the entire valve body. You can simply purchase a Jandy check valve rebuild kit, unscrew the cover, remove the broken internals, and drop in a fresh spring, flapper, and lid o-ring.
—
The Silent Killer: Check Valve Before Pool Heater Corrosion
While a draining spa is an annoying inconvenience, a failed check valve on your heater bypass loop can cost you thousands of dollars. As pool professionals, we cannot stress enough the importance of having a properly functioning check valve before pool heater corrosion turns your equipment pad into a graveyard of ruined metal.
The Chemistry of Back-Siphoning
Most modern saltwater pools utilize a Salt Chlorine Generator (SCG) or a traditional inline chemical tablet feeder (chlorinator). These sanitizing devices are always installed as the *very last* piece of equipment on the return line before the water goes back to the pool. This is intentional: it ensures that highly concentrated chlorine and acidic water do not pass through your heater or filter.
However, look at what happens when the pool pump turns off:
- Inside your chlorinator or salt cell, there is still standing water mixed with concentrated chemicals. In tablet chlorinators, the water becomes highly acidic (pH can drop to 2.0 or lower) and super-saturated with chlorine.
- Without a moving current of water to push these chemicals out to the pool, a natural process called chemical diffusion occurs. The highly concentrated chemicals migrate backward through the plumbing toward the pool heater.
- If there is no check valve—or if you have a pool spa check valve leaking back—this acidic, super-chlorinated water flows directly into the heater’s copper heat exchanger.

The Devastating Results of Copper Corrosion
Copper is an excellent heat conductor, which is why most pool heater exchangers are made of it. However, copper is highly vulnerable to low pH and high chlorine.
When acid backs up into the heater, it rapidly eats away at the copper tubing. This causes two major problems:
- Stained Pools: The dissolved copper is carried into your pool water when the pump turns back on. As the copper oxidizes, it deposits ugly blackish-purple or green stains on your beautiful pool finish.
- Heater Leaks: Eventually, the copper walls of the heat exchanger grow so thin that they pin-hole leak. Water will begin spraying inside your heater’s combustion chamber, completely ruining the electrical components and burner tray. Repairing a copper heat exchanger can easily cost $1,500 to $2,500—often prompting a complete heater replacement.
Installing a heavy-duty, corrosion-resistant CPVC check valve between your heater outlet and your chlorinator is your only line of defense. This simple $80 part stands guard, preventing any backflow of chemical-heavy water when the pump rests.
—
Quick-Reference: Check Valve Anatomy & Maintenance
To help you understand your pool’s defense systems, let’s break down the critical components of a standard service-friendly check valve:
| Component | Function | Common Failure Signs |
|---|---|---|
| Clear CPVC Lid | Allows visual inspection of the flapper and seal without disassembling the plumbing. | Cracking from UV exposure, water weeping from the lid screws. |
| Lid O-Ring | Creates a watertight and airtight seal between the valve body and the lid. | Flattened profile, dry rot, drawing air into the pump (suction-side leak). |
| Spring-Loaded Flapper | The mechanical gate that swings open under pressure and seals closed when pressure drops. | Warped rubber edges, cracked plastic hinge, or a completely snapped swing-pin. |
| Stainless Steel Spring | Provides the tension necessary to push the flapper firmly against the valve seat. | Rust spots, loss of spring tension, or spring snapping completely. |
—
Step-by-Step Guide: How to Replace a Jandy Check Valve Flapper
If you have diagnosed a failed check valve and have determined the plastic body is intact but the internals are shot, you can complete this rebuild yourself in about 15 minutes. Here is how:
Tools and Parts Needed:
- A genuine Jandy replacement flapper assembly (or compatible aftermarket kit)
- A Phillips-head screwdriver
- Silicone-based pool gasket lubricant (do NOT use petroleum jelly/Vaseline)
- A clean rag
The Rebuild Process:
- Turn off all power: Shut down the pool pump at the breaker panel or automation panel. Ensure no scheduled run cycles will start while you have the valve open.
- Relieve system pressure: Open the air relief valve on top of your pool filter until the pressure gauge reads 0 PSI.
- Remove the lid screws: Using your screwdriver, remove the 8 screws holding the clear lid in place. Work in a star pattern to avoid placing uneven stress on the plastic lid.
- Extract the old flapper: Lift off the lid and o-ring. Reach in and pull out the spring/flapper assembly. Note its orientation—the flapper must face the correct direction to
seal against the incoming water flow. - Clean the valve seat: Use your clean rag to wipe down the inside of the valve body. Ensure there is no debris, plaster dust, or algae buildup on the circular ridge where the flapper seals.
- Insert the new flapper: Slide the new assembly into place. Ensure the spring is positioned correctly and the rubber-ringed side of the flapper is facing the direction of the water source (so backflowing water pushes it tighter against the seat).
- Lube and seat the o-ring: Apply a thin film of silicone pool lube to the lid o-ring and place it back into its groove.
- Secure the lid: Place the lid back on and tighten the screws by hand. Use your screwdriver to snug them up in a star pattern. Do not over-tighten, as you can easily crack the clear CPVC lid.
- Test for leaks: Close the air relief valve on the filter, turn on the pump, and check the valve for any water leaks around the lid. Turn the pump off and verify that water is not back-siphoning.
—
When to Call the Pros at Tampa Bay Pool Care
While rebuilding a Jandy check valve is a highly manageable DIY project, there are times when you should leave it to a certified professional.
For instance, if you have old-style black ABS plastic valves, or cheap “swing” check valves that are glued directly into the plumbing without screws, you cannot easily rebuild them. The old valve must be physically sawed out of the PVC plumbing grid, and a new one must be plumbed in its place using primer and heavy-duty glue.
Working with PVC cement in tight spaces on an equipment pad requires precision. One crooked cut or poorly glued joint can starve your pump of water, cause massive air leaks, or completely restrict the flow of water to your heater.
If you are uncomfortable cutting into your equipment pad’s plumbing, or if your spa is still draining despite replacing the check valve internals, let the certified masters at Tampa Bay Pool Care take the wheel. We serve pools across the entire Tampa Bay region, ensuring your equipment operates at peak efficiency all year long.
—
Summary & Final Thoughts
Your pool check valves may be small, quiet, and unassuming, but they are the unsung heroes of your backyard paradise. Keeping them in top-tier working condition prevents the head-scratching mystery of your spa draining into the pool overnight, and acts as an essential shield protecting your heater from devastating acid corrosion.
Make check valve inspection a regular part of your seasonal pool maintenance. Check for dry-rotted seals, listen for clicking noises, and keep an eye on your spa water level. A tiny bit of preventative care today can save you thousands of dollars in equipment repairs tomorrow!