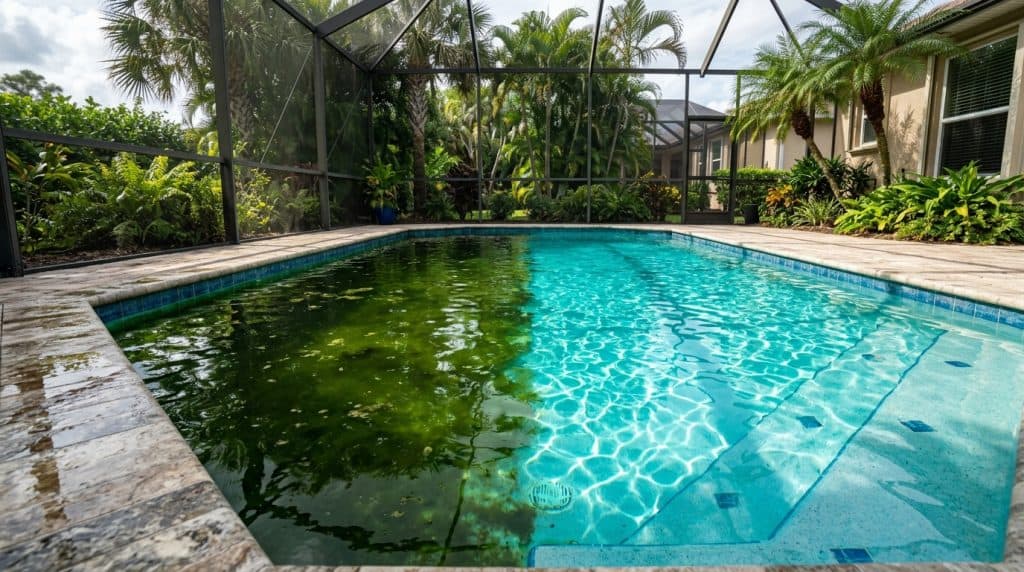
How to Turn a Green Pool Crystal Clear in 48 Hours: Florida Emergency Guide
The relentless Florida sun and sudden torrential rains can transform a pristine backyard oasis into a murky, uninviting swamp almost overnight. Algae thrives in our warm, humid climate, often catching homeowners off guard and demanding immediate, decisive action. This comprehensive guide provides the precise steps and expert insights to restore your pool’s clarity and sparkle, often within a mere two days.
Understanding the Enemy: Why Your Pool Turned Green in Florida
A green pool is almost invariably a sign of algae proliferation, fueled by a combination of factors particularly prevalent in the Tampa Bay area. Low sanitizer levels, especially free chlorine, are the primary culprit. Intense UV radiation from the Florida sun rapidly degrades chlorine, while heavy rainfall can dilute existing chemicals and introduce algae spores and phosphates. Furthermore, poor filtration due to a malfunctioning pump or a dirty filter can prevent the removal of microscopic algae, allowing it to bloom unchecked. Addressing these underlying issues is crucial for a successful fast 48-hour green pool recovery service and long-term prevention.
Another significant factor is imbalanced water chemistry beyond just chlorine. High pH levels reduce chlorine’s effectiveness, making it harder to kill algae. Elevated phosphate levels act as a super-fertilizer for algae, accelerating its growth even when chlorine is present. Organic debris like leaves, pollen, and even pet dander provide a food source for algae. Understanding these interconnected elements is the first step in formulating an effective strategy to combat the green menace and restore your pool to its former glory. Proactive weekly pool service and chemical maintenance are the best defense against these common Florida pool problems. If heavy shock doses fail to clear green water, your stabilizer levels may be excessively high, pointing to severe chlorine lock caused by cyanuric acid buildup.
The Essential Toolkit for a Green to Clear Pool Transformation
Before you begin the intensive process of turning your green to clear pool guide, gather all necessary supplies. Having everything on hand will streamline the operation and prevent frustrating delays. You will need a reliable water testing kit (liquid reagents are generally more accurate than test strips for this scenario), a sturdy pool brush, a heavy-duty leaf net or skimmer, and a powerful vacuum designed for pool use. Chemical-wise, ensure you have a substantial supply of calcium hypochlorite (cal-hypo) shock, which is a potent form of chlorine, or liquid chlorine (sodium hypochlorite), which is often preferred for its rapid action and lack of calcium contribution. Additionally, a clarifier or flocculant will be essential for consolidating dead algae, and a pH increaser/decreaser might be necessary to balance your water chemistry. Don’t forget appropriate personal protective equipment, including gloves and eye protection, when handling concentrated chemicals.
Step-by-Step Green Pool Recovery: The 48-Hour Plan
Day 1: Assessment, Initial Cleaning, and Massive Shock Treatment
Step 1: Assess and Prepare. Begin by thoroughly testing your pool water. Pay close attention to pH, alkalinity, calcium hardness, and especially free chlorine and cyanuric acid (CYA) levels. Record these readings. Remove all large debris from the pool using your leaf net, including leaves, twigs, and any other organic matter. This reduces the organic load that consumes chlorine. If your filter is particularly dirty, backwash or clean it before starting, as a clean filter is crucial for efficient water circulation during this process. Ensure your pump is running continuously.
Step 2: Balance pH and Alkalinity. For chlorine to work most effectively, your pH should be between 7.2 and 7.6. If your pH is high (common in Florida), use a pH reducer (muriatic acid or dry acid) to bring it down. If it’s too low, use a pH increaser (soda ash). Also, aim for total alkalinity between 80-120 ppm, as this buffers the pH and prevents wild swings. Adjusting these parameters before shocking ensures the chlorine you add will be maximally effective in killing the algae. Proper water balance is foundational to any successful green to clean pool guide.
Step 3: Brush and Vacuum. Aggressively brush the entire surface of your pool, including the walls, floor, steps, and any built-in features. This dislodges algae clinging to surfaces, making it easier for the chlorine to reach and kill it. After brushing, if the water is clear enough to see the bottom, vacuum the pool to waste if possible. Vacuuming to waste bypasses your filter, preventing it from becoming clogged with dead algae and sending the dirty water directly out of the pool. If vacuuming to waste isn’t an option, vacuum slowly and backwash/clean your filter frequently.
Step 4: Super Shock Treatment. This is the most critical step for clearing cloudy green pool water. You need to raise your free chlorine level dramatically to “breakpoint chlorination,” which means adding enough chlorine to oxidize all contaminants, including algae. A general rule of thumb for a dark green pool is to add 30-50 ppm of free chlorine. For every 10,000 gallons of water, this could mean adding 3-5 pounds of cal-hypo shock or 3-5 gallons of liquid chlorine. Always pre-dissolve granular shock in a bucket of water before adding it to the pool to prevent bleaching and plaster damage. Distribute the diluted shock evenly around the perimeter of the pool, preferably in the evening to minimize UV degradation. Run your pump continuously for 24 hours. After killing live algae blooms, suspended microscopic matter often creates milky water; learn how to resolve it in our troubleshooting guide for cloudy pool water after adding chemicals.
Day 2: Filtration, Flocculation/Clarification, and Fine-Tuning
Step 5: Monitor and Re-shock (if necessary). After 12-18 hours, retest your free chlorine level. If it has dropped significantly and the water is still green, you may need to add another round of shock. This indicates that a large amount of algae is still present and consuming the chlorine. Continue to brush the pool periodically throughout the day to keep algae suspended. If the water has started to turn cloudy blue or gray, it means the algae is dying, and you’re on the right track.
Step 6: Choose Your Weapon: Flocculant vs. Clarifier. Once the water is a cloudy gray or blue, it’s time to consolidate the dead algae. This is where the debate of pool flocculant vs clarifier comes into play.
- Pool Clarifier: A clarifier works by coagulating tiny particles into larger ones that your filter can more easily capture. It’s best for lightly cloudy or hazy water and requires a functioning filter. You add it, let your filter run, and the filter does the work.
- Pool Flocculant (Floc): Flocculant works much more aggressively. It forces all suspended particles, including dead algae, to clump together and sink to the bottom of the pool. This requires turning off your pump for several hours after application to allow everything to settle. Once settled, you must vacuum the debris directly to waste. Floc is ideal for very dense, cloudy water and achieves faster results, but it requires more manual effort in vacuuming. For a severely green pool, flocculant is often the faster and more effective choice for rapid clearing.
Choose the appropriate product based on your pool’s condition and your willingness to vacuum to waste. Follow the manufacturer’s instructions carefully for dosage and application.
Step 7: Vacuum to Waste (if using Flocculant). If you used flocculant, wait 6-8 hours (or overnight) for all the dead algae to settle at the bottom. Then, carefully set your multiport valve to “Waste” (or “Drain”) and slowly vacuum the settled debris from the bottom of the pool. Work slowly to avoid stirring up the sediment. You will lose a significant amount of water during this process, so be prepared to refill your pool. This step is critical for physically removing the dead algae from your pool system. If you’re experiencing issues with your pool pump during this process, it might be time for professional pool pump and motor repair in Tampa Bay.
Step 8: Filter Maintenance and Final Adjustments. After vacuuming or allowing your filter to run with a clarifier, backwash or clean your filter thoroughly. Repeat this process as needed until the water is clear. Recheck your water chemistry (pH, alkalinity, chlorine) and make any final adjustments to bring them into ideal ranges. Your pool should now be sparkling clear or very close to it.
Preventative Measures: Keeping Your Pool Crystal Clear
Once you’ve achieved a crystal-clear pool, the goal is to keep it that way. In the challenging Florida environment, consistent maintenance is key. Regular testing and balancing of your water chemistry are paramount. Maintain adequate free chlorine levels, ideally between 1-3 ppm, and ensure your pH, alkalinity, and calcium hardness are always within their recommended ranges. Consider using a phosphate remover periodically, especially if you have a history of algae blooms, as phosphates are a primary food source for algae. Brushing your pool weekly, even if it looks clean, helps to prevent algae from attaching and growing. Regularly clean your skimmer and pump baskets, and backwash or clean your filter according to manufacturer recommendations. Investing in a good pool cover can also help reduce debris and limit UV exposure to your chlorine. For homeowners in the region, consistent local pool maintenance services in Tampa can provide the peace of mind that comes with a perpetually pristine pool. For isolated dark blotches that resist liquid chlorine shocking, review our dedicated strategy on eradicating black algae and yellow mustard algae.
Regular professional attention can significantly reduce the likelihood of another green pool emergency. Expert technicians understand the nuances of Florida’s climate and its impact on pool chemistry, allowing them to proactively address issues before they escalate. They can spot early signs of trouble, such as a subtle shift in water balance or a minor equipment malfunction, preventing costly and time-consuming repairs down the line. This proactive approach not only saves money but also ensures your pool remains a source of enjoyment, rather than a constant chore, year-round. It’s a smart investment in the longevity and aesthetic appeal of your backyard retreat, safeguarding against the very problems this guide helps you solve.